Showing posts with label card. Show all posts

Friday, September 21, 2012

Marielle + Get Well Soon and My Lil Monster = FUN!


We are loving the projects with the older lines that the Divas have been doing.  Marielle is here today with some fun cards and layouts using the My 'Lil Monster and Get Well Soon collections.

Meeting Mike

My Lil' Monster collection....what a perfect collection for this photo of my boys meeting Mike from Monsters Inc. at Disney !!! I wanted to make the"Moon Monster" paper a little less busy by covering all of the images of the small yellow monsters by covering them with 1" circle of the red and white grid paper with pop dots. I wanted Mike and the hand trimmed green monster to be the focus of my layout. Mike is my very favorite Disney character :)


Love the raised circles on this card!

@Home sick 2-Day with the Chicken Pox
I have to admit that when I received this collection I wondered what I would create with it.....then this little cutie got the chicken pox !!! and voila ....I had an idea for this layout !!! Thanks Gabriel :) LOL!!! Love those cute little germs !


This card would make me (Katrina) better!

Thanks for stopping by today!  Be sure to visit Marielle's blog also.

Friday, September 14, 2012

Melanie on Friday!


Melanie has a little of everything today for you!  A card, layout and even a tutorial.  Yes, I would say she has been a busy crafting girl. 


Moms Make It All Better Card
I used the "Get Well Minis" sheet from the "Get Well Soon" line to make this card. The smaller patterns are perfect for cards! The cut-ups are on the back of the minis so I only used one sheet of paper. I zigzag stitched around the edges and added some twine from The Twinery to "tie" it all together :)  The punch-outs are fun little additions to help reinforce the message.


Superstar Student LO
It's a win-win for me when memorabilia matches paper! The Superstar Student sticker that my son brought home with his project matched the My Lil' Monster line so well that I decided to use the sticker for the title of my page. The "Meet-A-Monster" sheet was a fun way to frame the photos. I added some punch-outs and cut-ups from the Monster line. Tip: to help the red photo corner stand-out a bit on the lower left side of the page, I tucked an upside-down tab-shaped punchout behind it so the white backs the red.


Lantern Celebrate Banner Tutorial
We have TWO birthdays in the next three days at our house. So I thought it would be fitting to have a celebrate banner. :)  I used the My Lil' Monster line. Here is how I made it:


1. Cut apart the Monster Minis sheet so you have FOUR 6x6 squares.
2. Punch along the bottom side of each square using a border punch.
3. Using a strong adhesive (I used Glue Arts Extreme Tac Adhesive squares), overlap one side to the other and adhere together to form a tube (or lantern).
4. Punch one 1/8" hole on each side of the lantern along the top edge, about 1/4" down from the top.
5. Cut up or punch out three circles from the Monster line and punch two holes at the top of each circle.
6. Add monster punch out and celebrate sentiment to center circle.
7. Thread twine through each item, alternating lanterns and circle. Hang to enjoy!


I photographed the banner on my buffet so you could see it more clearly but then I also took a picture of it hanging from a tree outside since that is where the festivities will be.

Be sure to visit Melanie's blog for more fun projects and inspiration!


Monday, August 20, 2012

ABC Book Tutorial with Sarah


Sarah Eclavea is here on the blog today.  She is a teacher by profession and she came up with a fun idea on how to help your kids with their spelling! Bonus, she made a tutorial for you!!

 
Hi everyone! It's back to school time so I decided to make a little book with the School is Cool collection to help my daughter with her spelling. It's very easy to make and can be made easier or more difficult depepending on the age and skills of the student it is for.


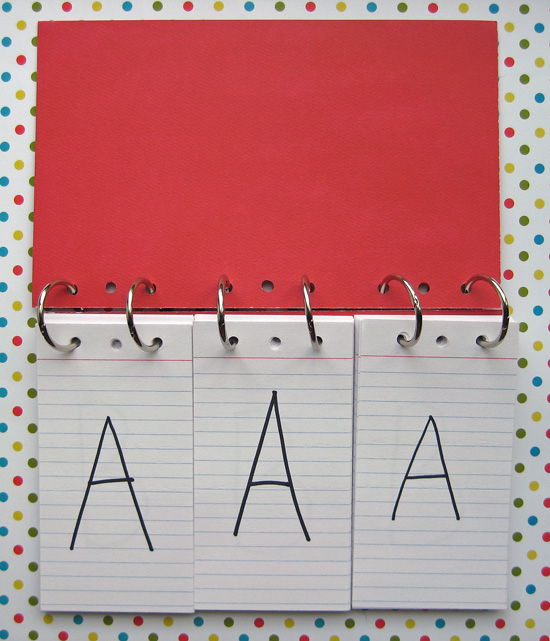
You will need the following to make this book- 26 8x5 index cards, 6 ring clips, one sheet 12 x 12 paper.
 
Step 1- Trim the cardstock to two sheets of 8 x 5 (one for front cover and one for back cover)
 
Step 2- Decorate the front cover with the "School is Cool" papers and punch outs.
 
Step 3- Trim each index card into three pieces of 2.7 inches each
 
Step 4- Write the alphabet (one letter per card) on each index card set.


Step 5- Punch holes through front cover, back cover and index cards and secure with ring clips.
 
Now your book is ready for some spelling! Just flip the pages to spell out lots of three letter words.


To make the book easier you can do only two sets of cards with pictures on one set and the letter is starts with on the other. Or to make it harder you can use four or five sets of cards. There's lots of possibilities with this!
 
The last project I have for you today is a card for my daughter's teacher that holds a gift card.


It is a 4x4 inch card which is the perfect little size for a gift card. I used two glue dots to hold the gift on cardstock. They come off easily when removing the gift card from the card.


Have a great school year everyone!

Well, I think I see a couple of projects that would be fun to make AND to give! That little book you could give to a teacher for her to use in her class and I am sure that teacher probably needs a gift card for something!  

Thanks for stopping by today and be sure to visit Sarah's blog!


Wednesday, August 15, 2012

Stacy and School is Cool, What a Combo!


Hello everyone Stacy here sharing some of my School Is Cool projects with you today.  My daughter has been back to school for about 2 weeks now. At first I was kind of lost....with herbeing a teenager I was pretty much a taxi driver all summer long.  Now it's just a ride to school and home, work on the weekends, and of course football games on Fridays. I had to figure out what to do with myself again while she was at school (can I even say I have taken a nap)!
So up first I have a little card with a touch of Ribbon Carousel twine tied around it.

I love to make little tags also, so this one is small in size which I thought was perfect for a bookmark.
I created this mini album for a friend to hold those super sweet grade school photos.  I took the photos of this without the binder rings on it.  I placed two binder rings on this about 1" down from the top and 1" up from the bottom then tied ribbon on it.  I LOVE the alphabet ribbon added to this from Ribbon Carousel, here is the cover.

Here is one of the inside pages.  I love all the little die cuts with this line, it makes making mini albums super fun and easy!

Thanks for stopping by today and checking out my back to school projects.

Thanks Stacy for sharing your projects with our readers!  Be sure to visit Stacy's blog also.

And don't forget Nikki's card kit available for purchase this month.


01 09 10