Showing posts with label Core'dinations Cardstock. Show all posts

Monday, September 13, 2010

The PURPLE has it!!!

I  don't know how it gets better to have PURPLE be part of a Halloween/Fall collection of papers!!! I love that mix-in of purple but then I also love patterns that will work for other times and occasions. 

The background, purple paper on my layout is one of those prints. I can think of so many reasons to use this pattern yet, how perfect it is with the oranges and greens for Halloween?  The scallops are cut from the shaped piece of patterned paper in this collection and the little row of purple hearts are from another piece. 
And, did you know almost all of the Nikki Sivils, Scrapbooker collections come in mini scrap pads? That means that the prints are smaller and oh, so perfect for cards!!!  The letters on my card are alphabet stamps by Nikki Sivils, Scrapbooker plus notice the purple rhinestones!  Why not dress up a Halloween card?  Take note too of the black cardstock for the base of this card, it is from the Black Magic colleciton of Core'dinations so the reverse side is green as is the core so when the edge was sanded it exposed the green color making this paper just perfect for my card.
The pumpkins were cut from one of the 12x12 pieces but the mini papers have a row of pumpkins on them too.
I also needed to show off some of the Tree Love collection since I love that too. 
That little tree is part of one of the patterns

Thanks for visiting, Linda, Design Team member

Saturday, August 7, 2010

Some older - Some newer

You just have to love when NEW papers and scrapping products are introduced, especially around CHA time but when I like a particular collection or patterned paper, I am still going to pull out the supplies in my stash, even if they have been around for a bit. These papers from the "Henry's Brilliance" collection are no exception! I am always on the lookout for patterns and colors that fit for BOY layouts since our three youngest grandkids are boys.
The oranges and dark blues in this collection are perfect. I am also a sucker for any print that is harlequin in pattern! Here, I combined two patterns and added in the BRAND NEW sticker letters from the "Blueberry Hill" collection. I can never get enough alphabet stickers so these work for me. Notice the tiny accents of the self adhesive buttons and they also already come with the thread in the holes - how does it get better!
Here I combined some new and some old! The papers are from the BRAND NEW "My Friend Birdie" collection. I used a piece from the smaller pads. These prints are the perfect size for cards. The sentiment was printed from the computer.
See those cute chairs? They are stamps from a previous release. I just stamped them on patterned papers and then cut them out.
And this card combines patterned and elements from the "Blueberry Hill" collection. I am madly in love with the blues and greens along with the yellow flowers. The flourish label beneath the flower is a Spellbinder Label die. I just love how easy these are to work with and the wonder shapes of these labels.
Thanks for visiting today, Linda Beeson, Design Team member

Saturday, June 26, 2010

Ellie's Day Out

Hi Everyone,
Anna here with today's post. Here in the UK is glorious and I am enjoying the beautiful English Summer we are having here at the moment.
Today I am sharing some projects using Ellies Day Out. As with all Nikki's collection, "Ellies Day Out" comes with a shaped pattern paper. I love my shaped papers, which is why I "heart" Nikki Sivils!!!


On this layout of my daughter "Blooming" I used a half sheet of "Ellies Day" and layered on to 2 strips of paper; Pure Shopping, Pink is Pretty.

I love the delicate doilies out at the moment, so added a small doilies for a feminine touch.


My photo of my daughter has been mounted onto "Ellies Shoes".

I love to cluster embellishment on my layouts. I had fun cutting out lots of embellishments from the diecut sheet, "Ellies Cutie Cut Ups".


Handbags, tickets and circles were layered and clustered with chipboard flowers, pretty mulberry flowers and a chipboard birdie.

Finally I used some chipboard to make my title and layered this onto the tickets from the diecut sheet.
Here in the UK, we still have a few more weeks of school left, and all us Mum's are thinking about Teacher gifts.

I made a Thank you card and a cute giftbag that I will definitely use as a Teachers Gift this year; add a few homemade sweets/cookies and a gift card and my present is complete!

Thanks Card


I cannot waste any of my scraps, this card was made using the scraps from my layout. I cut the scallop semi circle from "Ellies Day" and added a few scrap strips onto my card with 3d foam pads. A couple of diecut shapes and a jewel adds the finishing touches.


Gift Bag


These gift bags are a staple in my house for making quick thank you gifts with a couple of homemade cookies in.

1 sheet of paper is all you need to make 2 bags! I have added a diecut handbag, a scrummy corduroy brad and a flag. Just add some pretty coordinating ribbon to tie your bag together.

Instructions :
  • Trim your 12" x 12" sheet into 6" x 12"
  • Now score 1 1/2" in from each side
  • Next score 5" up from the bottom and from the top
  • Score 2" down and 1 1/2" in, on all 4 sides
  • Cut along the line to the 5" score line, and cut the 2" x 1 1/2" out.
  • Ink if you want all edges at this stage
  • Using double sided tape, adhere 2 of the flaps and stick to from a box
  • Now lift up the 2 sides, you now have your basic cookie bag.
  • I now made a flap to pop over the top of my bad, using a scalloped punch.
  • I stuck the scalloped circle onto one side of the bag, and punch a hole and thread ribbon through to keep the bag closed.
  • Decorate your bag as you wish :)

Enjoy your Summer, keep scrapping!

Anna x

http://www.scrappingtonight.blogspot.com/

Friday, June 18, 2010

Mixing patterns and products

I find my greatest inspiration for creating from challenges. A challenge this week at Moxie Fab is to create with a bicycle as part of the design. I love to use my own photos on cards whenever I can so this photo I had just taken of an adorable little house with a cute little bicycle sitting along the fence was the choice I knew I wanted to use.
With the colors in the photo, I could just see these papers from these two different collections matching just right. I love to use a collection of papers because they are made to go together so well, but I also love to pull together patterns from other collections that make it all work. The background paper is from the Will He B the 1 collection and the soft, green scallop circle is from the Ellie's Day Out collection. This piece is actually a larger circle but I cut just the green part out of the larger circle so it would fit on my card and so I could use this color.
My little flowers were created with punched out circles from the Date Night Strips patterned paper. I used those punched out circles as the base of my flowers with a little punched flower placed on that and a self adhesive button in the middle. These buttons are the BEST - self adhesive and cute with the little burlap look on them and the stitching already in place. How does it get any easier?

I cut out one of the little tickets for an accent and what is funny about that is that we were driving down the 101 in California when we stopped in this cute little town with Victorian houses everywhere and that is where I took this photo.
I already had this piece of Date Night Strips sitting on my desk so I cut out a portion of it to create my little birthday card.
The pink heart is part of the strip, I cut out an additional heart to layer over that and I also cut out tickets from the You're the Ticket paper.
I cut the strips apart in the piece of paper I had using scallop scissors and then I tucked the circle piece under the other so just a portion of the circles peek out.
Thanks for visiting, Linda Beeson, Design Team member

HAPPY BIRTHDAY - PARTY card
Materials list:
Cardstock – Core Essentials/Core’dinations
Patterned paper – Date Night Strips/Well He B the 1/Nikki Sivils Scrapbooker
Self adhesive buttons – Nikki Sivils Scrapbooker

Circle punch – Papershapers
Sandpaper
Self adhesive rhinestones – Queen & Co.
Foam tape – 3M
Alphabet stickers – K&Co.
Scallop scissors – Family Treasures
Machine sewing


FLOWERY BICYCLE card
Materials list:
Cardstock – Core Essentials/Core’dinations
Patterned paper – Hot Lips/Well He B the 1 and Ellie’s Day/Ellie’s Day Out/Nikki Sivils Scrapbooker
Ticket – Date Cutie Cut-Ups/Will He B the 1/Nikki Sivils Scrapboooker
Punched circles – Date Night Strips/Will He B the 1/Nikki Sivils Scrapbooker
Self adhesive buttons – Nikki Sivils Scrapbooker

Circle punch – Papershapers
Sandpaper
Self adhesive pearl flourish – Zva Designs
Foam tape – 3M
Alphabet stickers – K&Co.
Corner Rounder punch - Fiskars
Ribbon

Thursday, June 10, 2010

What can you do with one piece of paper?

Now, I did use more then one piece to complete the projects I am going to share with you, but the main piece of each project is taken from one piece of patterned paper. It is kind of like cutting a pie in several pieces and you sure wouldn't want to waste any pie or paper.
The above image is the piece of paper that I am talking about, taken from the Dan the Record Man collection. I wanted the black, record looking portion from this piece of paper. I started to cut off the scallop edge but I sure didn't want to waste any of that because I love scallop circles. So I very carefully got a cut big enough to get my scissors in, I used a medium scallop scissors that I have and started to cut around the inside of the circle, making scallop cuts on the backside of the bigger scallop edge. Now I have a complete, cut out circle to set aside for my next project. (you will be able to picture this piece better when you see the layout I created with it)
What I didn't realize when I started out cutting this piece is the neat, negative scallop edge that I would create around the black, record print circle. This was going to work to my advantage for my card because I thought it helped with a masculine look. I cut two partial circles to fit on the front of my card. The background piece on my card is from the "Hear the Beat" patterned paper. I LOVE this piece of paper, it just seems to fit so many themes in it's soft shades of yellow. The accent pieces are cut from the "Record Room" patterned paper.
Now, back to my scallop circle. . .

The background piece of paper is a ledger print from the North Pole Nights collection. I LOVE ledger prints, they are so neutral and go with everything. This piece was just the right colors that I wanted to use. My scallop circle from the 4 the Record paper is all cut and ready to go so that part was fast and easy. I cut out one strip of a ruler print from the Henry's Brilliance collection. I thought it had a "boy" look to it and the color was just right. I used a sketch from Unscripted Sketches for my layout, I love the inspiration that comes from finding sketches.

I punched out some of the record designs from the "Record Man" patterned paper. I thought they made really cute little accents, kind of along the line of flowers but with a more masculine feel to them. Brads in the centers finished those off.
I even have some pieces of my paper left so I'll need to think of what else to do with it.
Thanks for visiting, Linda Beeson, Design Team member

Dad card
Materials:
Cardstock - Core'dinations
Patterned papers - Dan the Record man collection/Nikki Sivils Scrapbooker
Sticker letters - Sticko
Brads


KISSABLE LIPS layout
Materials:
Cardstock – Core Impressions/Core’dinations
Patterned paper – Henry’s Brilliance, Dan the Record Man and North Pole Nights/Nikki Sivils Scrapbooker
Sticker letters – October Afternoon
Circle punches - Papershapers
Sandpaper

Monday, May 10, 2010

The 3-D details

I want to share with you a project that I have wanted to put together for awhile. I was recently issued a challenge to think "outside the box", so here it is, my finished 3-D Shadow Box!
Our youngest grandson is a rather busy little fella and so when I take photos of him, he is all over the place. This day when he and his sister were playing in the rain was no exception. I love to cut images out in silhouette so I thought this was the perfect time and a great way to show off some of that extra energy he has by using a few different poses from this day.


I want to go into a little detail to help you see the dimension I was able to create in my shadow box and it was so fun to use these particular Nikki Sivils Scrapbooker products to make my finished project adorable.
I basically have four layers. The little bee print paper is my background layer and some of the clouds are on that layer too. I cut the grass with scissors from the Butterfly Rest patterned paper. I just love this green piece, it can be so many different things and here it is my grass. One of the layers of the grass is also on the first or background layer. This cut out figure is the most foremost piece in my box. The bottom portion of him has one layer of foam tape, the portion under the umbrella has three layers of foam tape.
I took this photo so that you could "look down inside" at my layers. The full cut-out figure of my granddaughter holding her brothers hand has one layer of foam tape behind that to form the second layer.
The second strip of grass has two layers of foam tape pieces so that forms the third layer in my box. Notice how I placed the cut out figures of my granddaugher and her brother in between the grass and on top of some of it too.
When I mention my layers of foam tape, I am meaning that I am using these great little squares from 3L so I placed one piece on my figure, I remove the little protective paper that is on it and then place another piece of the foam tape on top of that. For three layers, I, of course, peel off that second protective layer and place another piece of foam tape on top of that. In the above photo, you can see behind the top umbrella, the three pieces of foam tape piled on top of each other.
I cut strips from the Bee Strips paper to accent the top, border of my box. The clouds are even added in layers and I hand cut my big raindrops. The raindrops are coated with the Aleene's Paper Glaze so they look wet. I added Glitter 3-D Fashion Paint by Tulip to some of the clouds for a slight glitter look.

So don't just save your photos for scrapbook layouts, try to think outside of the box to other ways to highlight them.

Thanks for visiting, Linda Beeson

RAINY DAY 3-D SHADOW BOX
Materials list:
Wooden shadow box – Provo Craft
Cardstock – Core Essentials/Core’dinations
Patterned papers – Bee 2 Bee, Bee Strips, Day Dreamer: Willow Bee Collection and Butterfly Rest: Flaming Butterfly Collection/Nikki Sivils Scrapbooker
Glitter 3-D Fashion paint/Tulip
Clear Paper Glaze – Aleene’s®
Sandpaper
Foam tape – 3M

Thursday, March 18, 2010

What can you do with one stamp?

I have been a rubber stamper for something like 20 years! I think the thing that fasinatinated me about the craft of stamping was that I could take one stamp and basically make it my own. I could experiment with different papers, different colors, different coloring mediums and my image would have a completely different look each time. OR...if I needed to make multiples of the same card for an invitation or a number of thank you cards, for example, I could stamp this same image as many times as I wanted without it costing my more money! You can tell, I fell in love with how versatile stamping can be.
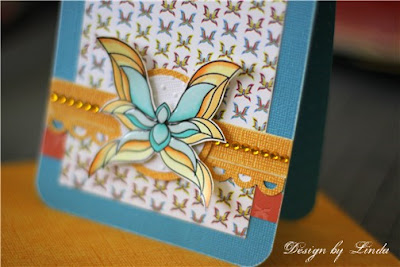
So, I took the large butterfly from the Flaming Butterfly set by Nikki Sivils, Scrapbooker to work with and I want to share some of what I came up with.
You can see that I created my background paper for my card by stamping one of the little butterflies in the set repeatedly on a piece of white cardstock. I didn't color in anything for this card, instead when I had stamped all of my butterflies with a Black Versafine stamp pad, I embossed all of them with clear embossing powder and then gave this piece a few spritzes of Glimmer Mist by Tattered Angels. I used two different colors of spray and then inked the outside edges of my piece with a turquoise blue Fluid Chalk stamp pad.
Now, when I stamped the large butterfly my challenge was to stamp the butterfly on some kind of paper so that I wouldn't have to color any of it in. I picked this great, kraft colored cardstock and stamped the butterfly once, again with the Versafine black stamp pad and embossed it with the clear embossing powder. Next I took a page from an old dictionary and stamped the butterfly again and embossed this one with the clear. For this second butterfly, I didn't cut out all of the image. I left off all of the outside layers of it's wings. I gently curled the wings on the second butterfly and then glued that in place over the first one, glueing it just down the middle so the wings were free. The green background paper on the card is also from the Flaming Butterfly collection.
For this card, I wanted to use this piece of patterned paper from the Flaming Butterfly collection for the background of my card but I wanted the butterfly to have soft colors.
I colored it with Copic markers, using very pale shades of the colors and I added some Aleene's Paper Glaze to the middle sections of the butterfly for some added interest. When this Paper Glaze is dry, it gives a 3-D, epoxy look.
This buttefly has rather soft shades of the colors too with an added interest.
After I colored it with Copic markers, I filled in all of the middle sections with Ultra Fine Flower Soft. Can you see the wonderful texture that gave my butterfly? The card base is Core'dinations cardstock. The lines were created with a Scor-Pal tool and then these lines were sanded.
I loved being your host today and I hope I showed you some fun ways to use your stamps!!!
Thanks for visiting, Linda Beeson

01 09 10