Showing posts with label Stamping. Show all posts

Friday, April 6, 2012

We are swapping with PSA Essentials-Day One

It's Day One of another swap with one of our cross promotional partners the next two days.  PSA Essentials is a unique stamp company in the industry.

So check out our blog and then head over to the PSA Essentials blog and see what their designers did with Nikki Sivils, Scrapbooker products!  Make sure and leave a comment here...see below!

Nikki's Noah line along with a cute baby stamp set from PSA Essentials was simply a perfect combo! Stacy Rodriguez created this super cute baby tag complete with banners, and those blue burlap buttons just set off this tag.  What a cute way to accent  a gift bag for a new little bundle of joy! 


Julie Tucker-Wolek created a couple of cute card using the Exit Here collection along with the set of PSA Essentials stamps that she got.  The colors were perfect for a girlie card and for a baby card.  And of course, the stamps went along perfectly also! 


Next up is Melanie Jarocki with an adorable tag.  She gave us some instructions on how she did the stamping.


I stamped the dress image on two different pattern papers--one light green and one light yellow, both from the Audrey collection. (I stamped in between the images on the paper so I would just get the solid color). Then I cut out the dress from the green, and the small flower on the dress from the yellow and placed it on the green dress. I used a white gel pen to color the top of the dress and the eyelet at the dress hem. The circle stamp is on the light yellow paper. I punched two circles out of the deep pink pattern paper in Audrey--one to pack the stamped circle with and the other to place the dress on. The "I'm Just A Girl" die cut sentiment was perfect for the tag with the cute dress.


And here is Laurel Seabrook with a cute card using the Noah collection with her set of PSA Essentials stamps!


Sarah Eclavea made an adorable Easter card with the Exit Here collection.

Since Easter is coming up I thought this little duck in the PSA Essentials Baby Stamp Set would go perfectly with the Exit Here line for a fun Easter Card. Isn't that little duck adorable! The stamp positioner was so easy to use and every time I stamped I got a crisp clear image. Love that! I punched my stamped image out with a circle punch and popped it up.  


Melissa Pablo created two different card/tag combos for her PSA Essentials projects!  She used Noah, Audrey and the Exit Here collections for these!

I wanted to create something that i can give to a couple of friends of mine who are both having babies and i decided to make  a card and tag set for a boy and a girl using the PSA stamper and peel & stick set. I love how quick, simple, and super easy to use the stamper set.

Using Noah

Using Noah

Using Audrey

Using Exit Here

We here at Nikki Sivils, Scrapbooker would love to thank PSA Essentials for allowing us to play with the fun stamp goodies they sent us!  I think the girls have had fun with them.


Want to know what the "hint" was about?

Here on the Nikki Sivils, Scrapbooker blog we are giving away a collection kit each day of this two day blog swap!  Your choice out of the four new collections! 

Just leave a comment here on the blog and over on PSA Essentials blog each day and you are entered!  Simple, quick and easy, right?!  


And be sure to come back tomorrow to see what the rest of the team did and for another chance to win a collection kit!

We will announce the winners of the collection kits here on the blog on Tuesday April 10th, so that gives you plenty of time to enter! 


Saturday, August 7, 2010

Some older - Some newer

You just have to love when NEW papers and scrapping products are introduced, especially around CHA time but when I like a particular collection or patterned paper, I am still going to pull out the supplies in my stash, even if they have been around for a bit. These papers from the "Henry's Brilliance" collection are no exception! I am always on the lookout for patterns and colors that fit for BOY layouts since our three youngest grandkids are boys.
The oranges and dark blues in this collection are perfect. I am also a sucker for any print that is harlequin in pattern! Here, I combined two patterns and added in the BRAND NEW sticker letters from the "Blueberry Hill" collection. I can never get enough alphabet stickers so these work for me. Notice the tiny accents of the self adhesive buttons and they also already come with the thread in the holes - how does it get better!
Here I combined some new and some old! The papers are from the BRAND NEW "My Friend Birdie" collection. I used a piece from the smaller pads. These prints are the perfect size for cards. The sentiment was printed from the computer.
See those cute chairs? They are stamps from a previous release. I just stamped them on patterned papers and then cut them out.
And this card combines patterned and elements from the "Blueberry Hill" collection. I am madly in love with the blues and greens along with the yellow flowers. The flourish label beneath the flower is a Spellbinder Label die. I just love how easy these are to work with and the wonder shapes of these labels.
Thanks for visiting today, Linda Beeson, Design Team member

Friday, May 21, 2010

Sometimes...

... I like to challenge myself :)
Hello there ! it's Michele Beck here today...

Sometimes i absolutely want an item, it can be a paper, a flower, a stamp... and when i get it, i don't use it.
I am sure it's the same for you !
Think about this wonderful paper you bought a few days (weeks?!) ago, this amazing brads you were dying for... and that you have never used!

Me, it's stamps.
I love stamps. I really mean it. How could i not love it? look at this one, or this one... aren't they toooo cute ?
what is too cool with stamps is that you can use it in so many ways...
Yes, i know that, so why i don't use it more often?
I don't know...
But today, i have challenged myself to make a page with lots of stamps!
So i take my Nikki Sivils Stamps, and i did it !
For this page, i used the line "Will He B the 1"


This alphabet stamps is just perfect for our title :


Now, it's your turn ! I want you to challenge yourself to make or use something you did not use to :) you'll see, it's fun !
thanks for stopping by :)
be creative!
Michele Beck

Wednesday, April 28, 2010

Celebrating Mom

Happy Wednesday paper crafting friends!!

Rae Barthel here today to share some cards
that I created using the fantabulous new product line

"Ellie's Day Out"

Have you started making your Mother's Day cards yet?
If not, I have some inspiration for you!

All you need is some of this
and this
and these


Throw in a dash of glitter
a tad of dry embossing
a few handmade flowers
and a splash of sparkly bling

and you will end up with this:

and this:
and this:

I had a glittery blast using papers from
Ellie's Day Out collection!
Who can resist darling papers named:
"Pink is Pretty"
"Ellie's Wallpaper"
"Ellie's Shoes"
"Ellie's Purse"
and
"Purse Shoppin'"?!

And the coordinating clear stamps?!
LVE how they stamp, so crisp & clear...
the perfect way to add a sentiment to a card!

So are you feeling inspired yet?
Go ahead, spoil Mom, or Grandma, or Great-Grandma,
or your Mom-in-Law with a handmade
sparkly, glittery card this Mother's Day...
you know that she deserves it!!

Ellie's Day Out is the perfect line for
Mother's Day card making!!

Have a GREAT day!!!
~Rae

{p.s. if you would like to learn how I created the
handmade spiral flowers I have a video tutorial
HERE on my blog}

Sunday, April 18, 2010

Spring is in the air!

And how better to celebrate then these amazing My Sweet Cherry Pie and Willow Bee products and a little candy, gift bag!?

First of all, you need to know that it is so fast and easy to put together a little bag like this. I found the template at Mels Stamps. She has a downloadable template and it works with 12x12 paper. The entire bag was cut from a piece of yellow Core'dinations cardstock and then I cut a partial bag from the Cherry Sweet gingham print. The top edge of that was punched with an Apron Lace border punch by Fiskars.

Here is a side view.

The flower is several layers, one being from the Willow Bee stamp set. I colored it with Copic markers and then layered it with a red cardstock circle and a scallop punched circle. Of course, the middle of the flower is one of the absolutely wonderful corduroy brads that Nikki Sivils offers with her collections.

This is what it looks like when it is empty but of course, it looks cuter with the suckers!

Thanks for visiting, Linda (lbpost) - a Nikki Sivils Scrapbooker Design Team member

Sunday, March 28, 2010

Earphones, Milkshakes & Shoes... oh my!

hello hello!!
Rae Barthel here, with my very first post here on the blog!!

Today I have a few cards to share with you using
some of Nikki's new products...
please sit back, relax & enjoy!!

First up...
a card using the fabulous new
"Dan the Record Man" collection!!

'U ROCK' card
I just adore the 'retro' whimsy of this collection...
from the 45 record adapters to the record players,
it just oozes fun!
I also used some Willie-Bee Alpha Clear Stampies
here to create my banner.

Next up....
the darling new "Will He B the 1" line!
I love the color palette in this collection, and I know that
I will turn to it often to create lovey-dovey anniversary and
date night cards!

'Happy Anniversary' card
Isn't that love note on the lined paper just the cutest thing ever,
way to go Nikki, what a fun & clever design!! love it!!
I also used the "Will He B the 1" clear stamp set
to stamp the "Happy Anniversary" sentiment.

Last, but certainly not least, is a card made from the
oh-so-cute "Ellie's Day Out" collection!!
Purses and shoes galore mixed with graphic retro patterns
and prints... such a fun collection!!
Yet again I used the collection's coordinating clear stamp set,
to stamp the sentiment on the card.

"Too Many Shoes?" card
Speaking of stamps, have I told you how much
I LOVE Nikki's clear stamps?
Getting beautifully clean & clear stamped images
on the first try makes me very happy!

Well, thank you for taking the time to view my cards!
Looking forward to making & sharing many more cards using
these fantastical new Nikki Sivils collections!!

Until next time...
happy card making!

xoxo~ rae

Thursday, March 18, 2010

What can you do with one stamp?

I have been a rubber stamper for something like 20 years! I think the thing that fasinatinated me about the craft of stamping was that I could take one stamp and basically make it my own. I could experiment with different papers, different colors, different coloring mediums and my image would have a completely different look each time. OR...if I needed to make multiples of the same card for an invitation or a number of thank you cards, for example, I could stamp this same image as many times as I wanted without it costing my more money! You can tell, I fell in love with how versatile stamping can be.
So, I took the large butterfly from the Flaming Butterfly set by Nikki Sivils, Scrapbooker to work with and I want to share some of what I came up with.
You can see that I created my background paper for my card by stamping one of the little butterflies in the set repeatedly on a piece of white cardstock. I didn't color in anything for this card, instead when I had stamped all of my butterflies with a Black Versafine stamp pad, I embossed all of them with clear embossing powder and then gave this piece a few spritzes of Glimmer Mist by Tattered Angels. I used two different colors of spray and then inked the outside edges of my piece with a turquoise blue Fluid Chalk stamp pad.
Now, when I stamped the large butterfly my challenge was to stamp the butterfly on some kind of paper so that I wouldn't have to color any of it in. I picked this great, kraft colored cardstock and stamped the butterfly once, again with the Versafine black stamp pad and embossed it with the clear embossing powder. Next I took a page from an old dictionary and stamped the butterfly again and embossed this one with the clear. For this second butterfly, I didn't cut out all of the image. I left off all of the outside layers of it's wings. I gently curled the wings on the second butterfly and then glued that in place over the first one, glueing it just down the middle so the wings were free. The green background paper on the card is also from the Flaming Butterfly collection.
For this card, I wanted to use this piece of patterned paper from the Flaming Butterfly collection for the background of my card but I wanted the butterfly to have soft colors.
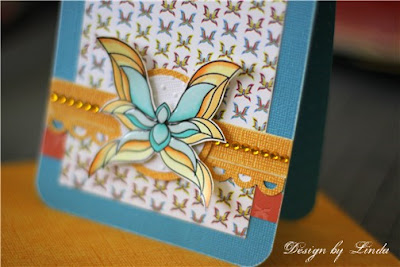
I colored it with Copic markers, using very pale shades of the colors and I added some Aleene's Paper Glaze to the middle sections of the butterfly for some added interest. When this Paper Glaze is dry, it gives a 3-D, epoxy look.
This buttefly has rather soft shades of the colors too with an added interest.
After I colored it with Copic markers, I filled in all of the middle sections with Ultra Fine Flower Soft. Can you see the wonderful texture that gave my butterfly? The card base is Core'dinations cardstock. The lines were created with a Scor-Pal tool and then these lines were sanded.
I loved being your host today and I hope I showed you some fun ways to use your stamps!!!
Thanks for visiting, Linda Beeson

01 09 10