Showing posts with label Melanie Jarocki. Show all posts

Friday, September 14, 2012

Melanie on Friday!


Melanie has a little of everything today for you!  A card, layout and even a tutorial.  Yes, I would say she has been a busy crafting girl. 


Moms Make It All Better Card
I used the "Get Well Minis" sheet from the "Get Well Soon" line to make this card. The smaller patterns are perfect for cards! The cut-ups are on the back of the minis so I only used one sheet of paper. I zigzag stitched around the edges and added some twine from The Twinery to "tie" it all together :)  The punch-outs are fun little additions to help reinforce the message.


Superstar Student LO
It's a win-win for me when memorabilia matches paper! The Superstar Student sticker that my son brought home with his project matched the My Lil' Monster line so well that I decided to use the sticker for the title of my page. The "Meet-A-Monster" sheet was a fun way to frame the photos. I added some punch-outs and cut-ups from the Monster line. Tip: to help the red photo corner stand-out a bit on the lower left side of the page, I tucked an upside-down tab-shaped punchout behind it so the white backs the red.


Lantern Celebrate Banner Tutorial
We have TWO birthdays in the next three days at our house. So I thought it would be fitting to have a celebrate banner. :)  I used the My Lil' Monster line. Here is how I made it:


1. Cut apart the Monster Minis sheet so you have FOUR 6x6 squares.
2. Punch along the bottom side of each square using a border punch.
3. Using a strong adhesive (I used Glue Arts Extreme Tac Adhesive squares), overlap one side to the other and adhere together to form a tube (or lantern).
4. Punch one 1/8" hole on each side of the lantern along the top edge, about 1/4" down from the top.
5. Cut up or punch out three circles from the Monster line and punch two holes at the top of each circle.
6. Add monster punch out and celebrate sentiment to center circle.
7. Thread twine through each item, alternating lanterns and circle. Hang to enjoy!


I photographed the banner on my buffet so you could see it more clearly but then I also took a picture of it hanging from a tree outside since that is where the festivities will be.

Be sure to visit Melanie's blog for more fun projects and inspiration!


Friday, August 10, 2012

A Goody Bag, Layout, and Candy fun from Melanie

Melanie Jarocki has some fun projects today for gift ideas and a layout too!  She used School is Cool, since it is THAT time of year!!

Thanks So Much Goody Bag

I love the journaling cards in the School is Cool line. This bus one was perfect to add an SRM sentiment to thanking our bus driver with a bag of cookies. The bus punch-out was a great finishing touch. I tied the bag off with twine from The Twinery. 


First Day of School Layout

My son's first day of kindergarten. He was SO excited, not only to go to school with his older siblings, but to also get to ride the bus AND take his lunch to school. What a great way to celebrate this special day with School is Cool's fun graphics and primary colors.  For a little pop, I backed the Blue letter stickers with white photo paper to help them stand out from the white background. And you know I love banners--so to mix things up I put punch-out pennants with pennants cut from the pattern paper. Twine from The Twinery and Fabri-Tac glue from Beacon Adhesives  keep the banner in place. 


You're The Best Tube and Card

This ensemble is a fun way to say thank you to a teacher. I added some Reese's Pieces in the tube and topped it off with the award ribbon punch-out. The matching card includes another journaling card from the line, along with SRM sentiments and twine from The Twinery.


Thanks for visiting today.  I hope Melanie gave you some fun gift ideas for those that take care of your little ones during the school year.  Be sure to visit Melanie's blog also!

And don't forget Nikki's card kit available for purchase this month!! It is AMAZING!! 


Friday, July 13, 2012

Melanie is our Friday girl today!


Melanie Jarocki is here on this fabulous Friday with a couple of card and a couple of layouts to share.  

Oh Snap Card
The camera cut-up from the Exit Here collection was perfect for this sentiment with belated birthday wishes. In addition to the Exit Here papers and die cuts, I used the red mini letters from Nikki's collection, twine from The Twinery, and an SRM sticker sentiment. 


#1 Fan Layout
My little guy gets toted around to his older siblings sports events all year. So I thought it would be fitting to make a layout documenting that he is their #1 fan. The Noah Collection provided the perfect game-day colors and images for the layout. I love all the die-cuts and cut-outs in Nikki's collections. They make for the perfect page embellishments. I also used my Slice to cut out the #1 and then used a white gel pen to fill it in. I added in some more pen outlines in red, white stitching, and edge-inking to finish off the page.


Celebrate Card

My daughter was attending a friend's birthday party and asked me to make a card for her. Her friend, Cora, loves ballet and bright colors. So, I turned to the Audrey collection for it's colors and feminine patterns. The ballerina image was cut with my Slice machine. I added some yellow tulle and beading with Beacon's 3-in-1 adhesive to make the dancer's tutu. (BTW, I saw Cora and her dad the next day. Cora told me how much she loved the card, and even her dad mentioned that it was really neat. LOL).


Always Layout

I broke from my traditional 12x12 format and made an 8-1/2x11 layout for this photo of my son. I used the Messages collection to match the photo's outdoor, masculine image. But because of the message I wanted to convey, I added in the heart images to form a visual triangle around the page. 


Well that was a lot of goodness to share right there!  Thanks Melanie for taking the "holiday" spot on the blog!  

Be sure to visit Melanie's blog also to see what she has been up to.


Saturday, June 16, 2012

Tutorial with Melanie Jarocki

Melanie created this fab banner and a tutorial for our readers to recreate it!  So, let's see what is up.....


For this Father's Day banner, I mainly used the Noah collection, but also adding in one sheet from the Exit Here collection. The banner could easily be adapted for a 4th of July celebration in the USA or for a birthday.


Preparation
1. Cut six 4x6 inch rectangles from Exit Here "Hiking Trails". Trim one short edge of each rectangle into a wide upside down "V". (I went about 1 inch up from the bottom, 2 inches in from the side and made a pencil mark. Then I cut from each corner to the mark.) (The rest of the papers are all from the Noah Collection). 

2. Using a die-cut machine or template, cut 3-1/2 inch letters from "Noah's ABC's", along with shadows and heart shapes from "Honk, Honk". (I used my Slice machine, Great Outdoors card for the letters, and Remember This card for the hearts).


3. Trim two 1/2x12 inch strips from "Noah's Overalls". Cut each strip into three 1/2x4 inch strips, so you have six total strips. 

4. Using a border punch with some sort of hole in it (I used Martha Stewart star border punch), punch along the edge of "Noah's Wallpaper". Then trim a 1-1/2 inch strip from the edge of the punched border. Repeat. Cut each 12-inch strip into three strips that measure 1-1/2x4 inches.  

5. Fussy cut 20-25 stars from "Noah's Stars".
  

Assembly
6. Adhere punched border strips to tops of rectangles (opposite "v" ends), leaving 3/4-inch showing (including the punched border). Add 1/2-inch strips from "Noah's Wallpaper" on the pennant below the border, with 1/8-inch of blue background showing. Zigzag stitch between punched border and 1/2-inch strip. 

7. Assemble letters with shadows and trace around letters with red pen. Using a dimensional adhesive (I used GlueArts U-Cut-It), place smaller heart on larger heart. Adhere each of these pieces to a pennant, centering above the "V". 

8. Add a 3-1/2x5 inch photo to the remaining pennant. 9. Randomly add fussy-cut stars to each pennant.  

10. Thread twine (I used Maraschino from The Twinery) through the punched borders and hang to display. Ta-Da! 

What a fun banner!  And it can be adapted many ways, by changing the wording, adding panels, etc!  Thanks for the great project and instructions, Melanie.  Be sure to visit Melanie's blog.


Wednesday, June 6, 2012

Melanie on Wednesday and Basically Bare Winners

Winner Day One for the Basically Bare Swap is.......

Janet Zeppa

Winner Day Two for the Basically Bare Swap is.....

Becky Garrison

Ladies, please email me at cardipaws@sbcglobal.net with your choice of collection kit and your shipping address.   Congrats!


Today Melanie Jarocki is up on the blog....I am going to let her take it away......


Thinking Of You
One of my favorite ways to spice up a project is to fussy-cut. I love all of the images in the Audrey line and thought it would be fun to cut some of them out and pop them off the page. I added some Pink Sorbet twine from the The Twinery, along with Nikki's small yellow alphas to complete the card.


You Are So Berry Sweet
Did you know that the sentiment squares at the top of Nikki's cut-ups pages are the perfect size for gift cards? 

I cut this Berry Sweet one from the Audrey collection sheet and then machine-stitched it to the background paper. By just stitching around the sides and bottom of the square, I could insert a gift card into the top for a perfect gift card holder.


Ok, well I just learned something!  I had no idea that those were the perfect size for gift cards!  

Be sure to visit Melanie's blog!


Wednesday, May 30, 2012

We are Blog Swapping with Basically Bare! Day One!

Do you like embellishments?  Do you like to "create your own" using a bare base?  Well, we are starting a two day blog swap with Basically Bare today and that is just what the Divas are going to show you!  Basically Bare not only has unique and fun mini books to alter, but they have bare chipboard, canvas, arcrylic, and cardboard embellishments to make your own to match your layouts with the paper collection you are working with!

We will also be having a giveaway, but you will have to comment here on the blog and also over at Basically Bare's blog.  Their designers have created some FUN FUN FUN stuff and I can't wait for you to see it!  But, let's look at what the Divas created first!

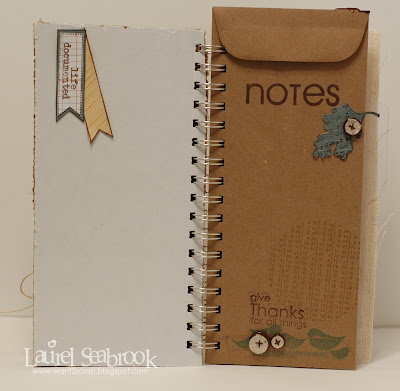
Laurel Seabrook used the Messages collection to make a journal from one of the mini books the girls were sent.  Here is Laurel to tell you about it.....

Hi everyone, Laurel here.  I am so excited to bring you my Basically Bare project today.  I loved this mixed album as soon as I saw it in my package and couldn't wait to use it.  I decided to make a Gratitude Journal and have left lots of space for adding photos I take, lots of journaling and I love the few envelopes for holding memorabilia or more photos.  I had a lot of fun creating this, I used lots of stamps and Cricut cuts and for adhering the items to the pages I have used the Beacon 3 in 1 Glue.

(Laurel has more pictures of her complete album on her blog)


Jodi Wilton created this CUTE altered frame project that I want her to send me!  I love how the two collections mixed perfectly! Let's hear from Jodi......

I used the six of the chipboard Hearts from to create a home decor project! The hearts were perfect because they were nice and thick, which added a lot of dimension to the project! I covered the hearts with EXIT HERE and AUDREY collections, and added the hot air balloon to tie in the title.


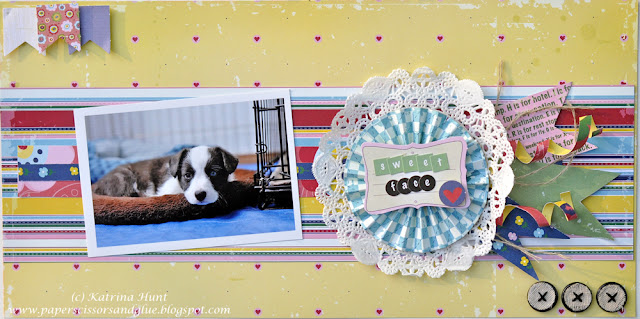
I (Katrina) made this layout about my first trip to CHA using the Audrey collection.  I will have close ups of the dress and heart on my blog. 

The girly collection was perfect for the dress form and wings!  I also used a canvas heart and some of the chipboard blossoms to accent my picture.  Double bonus is that that cluster also holds my layout title!  BTW, Suzy is glowing..I am sweating!  July in downtown Chicago during the heatwave last year!


Deana Boston had fun creating with the Basically Bare Celestial Shapes set using the sun and clouds for her layout about a flat tire!!  She used the Noah collection for her layout. 


Deana added sequins to her sun and wrapped twine around the felt clouds!

Melanie Jarocki created a couple of cute and fun cards using Audrey and Noah.


Sarah Eclavea has done a fun little mini with the Exit Here collection.  Here are a few of the pages from it.


Did you get some ideas?  Are you wanting to get your hands on some Basically Bare and Nikki Sivils, Scrapbooker goodies?  Well, we can help you with the Nikki Sivils, Scrapbooker part!  Leave a comment below and we will draw one winner for a collection kit of your choosing.  Basically Bare has a giveaway on their blog also, so be sure to comment on BOTH blogs!! And comment on tomorrow's post, because we will have a giveaway there too!


Monday, May 28, 2012

Another Sketch Support layout and Winner

Well, my bad!  I totally forgot to pick a winner for Mary Pat Siehl's guest post.  Thanks to Miriam for pointing it out to me!

And the winner is.....

Blogger Kerys said...
I just love all of Mary Pat's work! I am a follower of her blog and love to see her new creation! I love the card with the pockets and the gift bag and card for father's day is just adorable - I feel a projects with my kids coming on!!! Thanks Mary Pat for a great day of inspiration :-) Have a great day x

Kerys, please email me at cardipaws@sbcglobal.net with your choice of a collection kit from the following collections: Exit Here, Audrey, Noah or Messages!


AND for being on her toes and I am in a generous mood.....

Blogger Miriam Prantner said...
Mary did a great job! I really love her Father's day projects. Somehow I am just into ties these days.

Miriam, please email me with your choice of a collection kit from the ones listed above!!!

Congrats girls!

Now, I have a layout from our Diva, Melanie Jarocki using the one page sketch from Sketch Support that I had forgotten to post!  She used the fun collection Exit Here for her layout.


What a great take on the sketch!!!  I hope everyone had a good holiday weekend and we will be back Wednesday and Thursday with some fun projects using Basically Bare goodies!  Come and see what it's all about then!


Friday, May 18, 2012

Sketch Support Add On Friday

This week is the add on sketch week over at Sketch Support.  If you aren't sure what an "add-on" sketch is...well it is just that...an add on!  You can make something with just the sketch or add it to a layout, card etc.  Basically it is a sketch for an embellishment.  I think you will be able to tell what the sketch is!

Noah Collection


Messages Collection


Exit Here Collection


Noah Collection


Exit Here Collection 
(in case you are wondering, this is a 6x12 inch layout)


Be sure to head over to Sketch Support to see what the team created with their Nikki Sivils, Scrapbooker collections they got.


01 09 10