Showing posts with label Altered Projects. Show all posts

Tuesday, September 25, 2012

Katrina here with some Get Well Soon and My 'Lil Monster

 Katrina here with some projects for you.  An altered project and a layout or two or three.

I have to say that My 'Lil Monster is one of my very favorite Nikki collections out of all of them.  I love the color palette, the patterns, just everything in the collection.  Plus the fact that the monsters are adorable.  


First up a two page layout using an Allison Davis sketch to go by.  I just love that striped paper!

And another two page layout.  I really couldn't decide exactly how I wanted the journaling, so until I decide, I left that area blank.

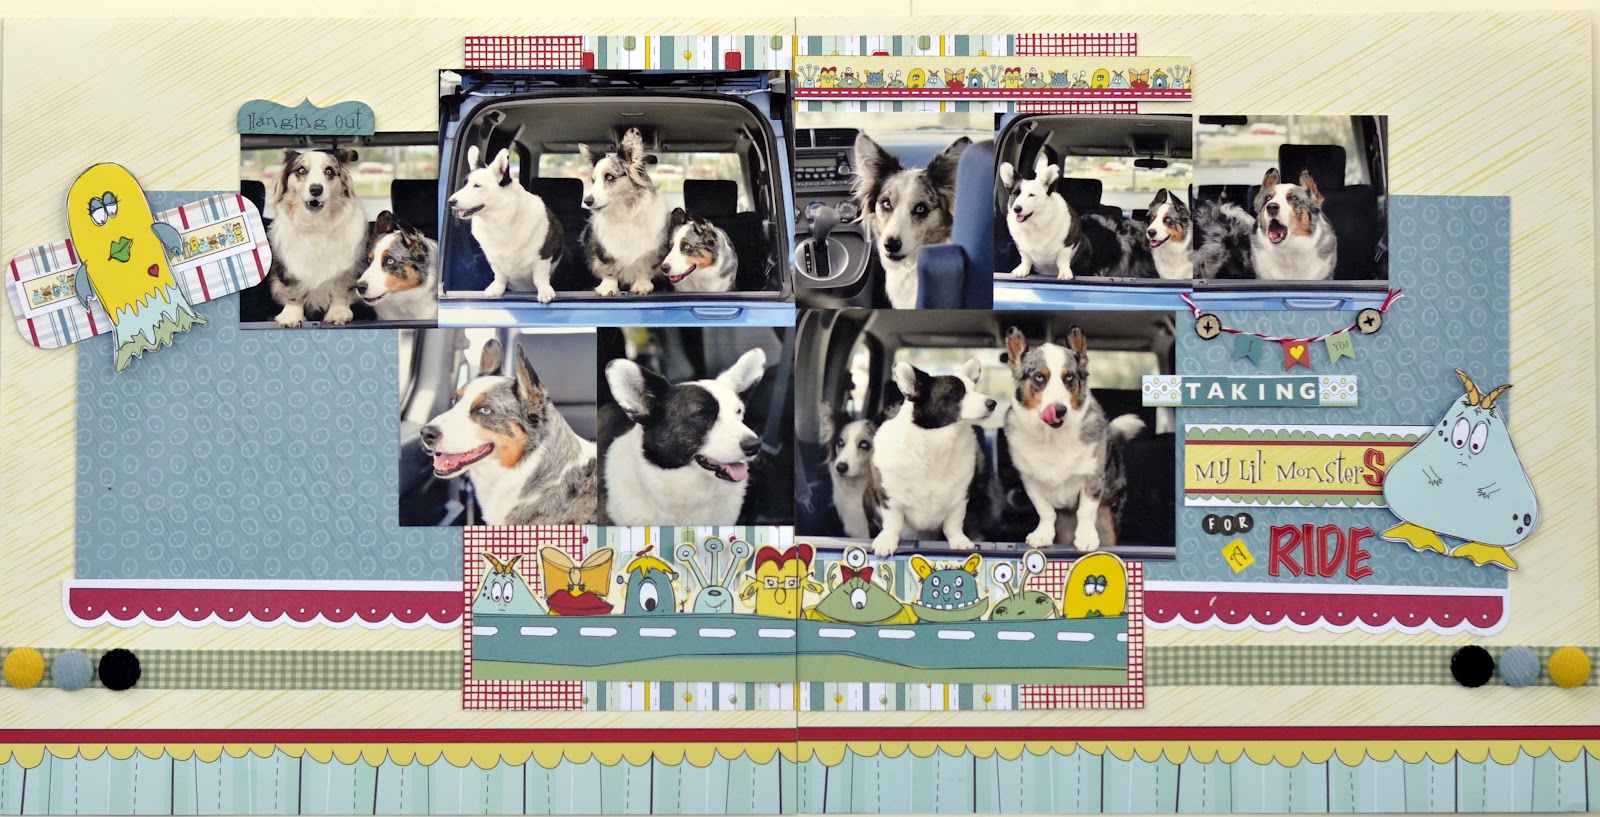
Close up of the title work.  I had a lot of fun with this title!

This is a possible reappearance on the blog for this layout, but I love how it showcases that you can change the theme to fit your pictures.  Nikki did create a monster when she introduced me to scrapping!

Below is an altered chipboard house using the collection.  Inside are cards to match made out of the pattern paper, stickers, etc.  Great for the kids to play with!  


Then the Get Well Soon collection if one of the more fun collections for me, I think!  I had a lot of fun with those little germs and baterica cutting them out and using them as embellishments on a wooden tissue box that I altered. 


And the collection doesn't have to be used just for humans!  I had fun snapping these pictures in the exam room while we were waiting for Dr. B to come in and see us.  Well, it kept me entertained anyway!


That's all from me today!  Thanks for stopping by.  If you want to stop by my blog, feel free to!


Friday, September 14, 2012

Melanie on Friday!


Melanie has a little of everything today for you!  A card, layout and even a tutorial.  Yes, I would say she has been a busy crafting girl. 


Moms Make It All Better Card
I used the "Get Well Minis" sheet from the "Get Well Soon" line to make this card. The smaller patterns are perfect for cards! The cut-ups are on the back of the minis so I only used one sheet of paper. I zigzag stitched around the edges and added some twine from The Twinery to "tie" it all together :)  The punch-outs are fun little additions to help reinforce the message.


Superstar Student LO
It's a win-win for me when memorabilia matches paper! The Superstar Student sticker that my son brought home with his project matched the My Lil' Monster line so well that I decided to use the sticker for the title of my page. The "Meet-A-Monster" sheet was a fun way to frame the photos. I added some punch-outs and cut-ups from the Monster line. Tip: to help the red photo corner stand-out a bit on the lower left side of the page, I tucked an upside-down tab-shaped punchout behind it so the white backs the red.


Lantern Celebrate Banner Tutorial
We have TWO birthdays in the next three days at our house. So I thought it would be fitting to have a celebrate banner. :)  I used the My Lil' Monster line. Here is how I made it:


1. Cut apart the Monster Minis sheet so you have FOUR 6x6 squares.
2. Punch along the bottom side of each square using a border punch.
3. Using a strong adhesive (I used Glue Arts Extreme Tac Adhesive squares), overlap one side to the other and adhere together to form a tube (or lantern).
4. Punch one 1/8" hole on each side of the lantern along the top edge, about 1/4" down from the top.
5. Cut up or punch out three circles from the Monster line and punch two holes at the top of each circle.
6. Add monster punch out and celebrate sentiment to center circle.
7. Thread twine through each item, alternating lanterns and circle. Hang to enjoy!


I photographed the banner on my buffet so you could see it more clearly but then I also took a picture of it hanging from a tree outside since that is where the festivities will be.

Be sure to visit Melanie's blog for more fun projects and inspiration!


Wednesday, August 29, 2012

Nikki Sivils, Scrapbooker and Ribbon Carousel Blog Hop


Is hopping with Ribbon Carousel today! 


We usually do not "hop" just swap, so it's a little different for us today!  All of our designers have some fun projects for you to see along the way.  And I am sure those Ribbon Carousel girls have some great projects also.  

There are some prizes involved so be sure to comment on everyone's blog postings to be eligible.  We have an InLinkz at the end of the post to make it easier for you to hop along with us.  

Nikki Sivils, Scrapbooker will be giving away a collection kit of the winner's choosing and Ribbon Carousel will be giving away a $25.00 gift certificate to the Ribbon Carousel Store!  Winners will be announced on Saturday night at 8:00 PM Eastern time.  So you have a couple of days to get thru everyone's blog and comment to be eligible to win.  

We are so excited because Nikki got to play along with us this time.  She made an adorable matchbook mini album out of the Exit Here collection.  This a perfect way to make a mini without having a chipboard album.  (Maybe we can get her to do a tutorial on here?!) 

The ribbon package that we received to work with went perfect with Exit Here.  


How cute!  Now, if I can just find the time to make all these projects I want to make.  Could someone please find it for me, because I cannot seem to!

Ok, the InLinkz is below.  Make sure to hop and comment on everyone's blogs and projects.  We will announce the winners on Saturday.  Thanks for stopping by today!


Monday, August 20, 2012

ABC Book Tutorial with Sarah


Sarah Eclavea is here on the blog today.  She is a teacher by profession and she came up with a fun idea on how to help your kids with their spelling! Bonus, she made a tutorial for you!!

 
Hi everyone! It's back to school time so I decided to make a little book with the School is Cool collection to help my daughter with her spelling. It's very easy to make and can be made easier or more difficult depepending on the age and skills of the student it is for.


You will need the following to make this book- 26 8x5 index cards, 6 ring clips, one sheet 12 x 12 paper.
 
Step 1- Trim the cardstock to two sheets of 8 x 5 (one for front cover and one for back cover)
 
Step 2- Decorate the front cover with the "School is Cool" papers and punch outs.
 
Step 3- Trim each index card into three pieces of 2.7 inches each
 
Step 4- Write the alphabet (one letter per card) on each index card set.


Step 5- Punch holes through front cover, back cover and index cards and secure with ring clips.
 
Now your book is ready for some spelling! Just flip the pages to spell out lots of three letter words.


To make the book easier you can do only two sets of cards with pictures on one set and the letter is starts with on the other. Or to make it harder you can use four or five sets of cards. There's lots of possibilities with this!
 
The last project I have for you today is a card for my daughter's teacher that holds a gift card.


It is a 4x4 inch card which is the perfect little size for a gift card. I used two glue dots to hold the gift on cardstock. They come off easily when removing the gift card from the card.


Have a great school year everyone!

Well, I think I see a couple of projects that would be fun to make AND to give! That little book you could give to a teacher for her to use in her class and I am sure that teacher probably needs a gift card for something!  

Thanks for stopping by today and be sure to visit Sarah's blog!


Friday, August 10, 2012

A Goody Bag, Layout, and Candy fun from Melanie

Melanie Jarocki has some fun projects today for gift ideas and a layout too!  She used School is Cool, since it is THAT time of year!!

Thanks So Much Goody Bag

I love the journaling cards in the School is Cool line. This bus one was perfect to add an SRM sentiment to thanking our bus driver with a bag of cookies. The bus punch-out was a great finishing touch. I tied the bag off with twine from The Twinery. 


First Day of School Layout

My son's first day of kindergarten. He was SO excited, not only to go to school with his older siblings, but to also get to ride the bus AND take his lunch to school. What a great way to celebrate this special day with School is Cool's fun graphics and primary colors.  For a little pop, I backed the Blue letter stickers with white photo paper to help them stand out from the white background. And you know I love banners--so to mix things up I put punch-out pennants with pennants cut from the pattern paper. Twine from The Twinery and Fabri-Tac glue from Beacon Adhesives  keep the banner in place. 


You're The Best Tube and Card

This ensemble is a fun way to say thank you to a teacher. I added some Reese's Pieces in the tube and topped it off with the award ribbon punch-out. The matching card includes another journaling card from the line, along with SRM sentiments and twine from The Twinery.


Thanks for visiting today.  I hope Melanie gave you some fun gift ideas for those that take care of your little ones during the school year.  Be sure to visit Melanie's blog also!

And don't forget Nikki's card kit available for purchase this month!! It is AMAZING!! 


Tuesday, July 10, 2012

Melissa is having some Summer fun...


Our Divas were sent some of the previous collections to spin their magic with and Melissa Pablo is one of the first ones to post on the blog with some of her projects!

I Love Summer
I love, love the colors of Summer collection and I wanted to do a super simple and fast layout, so with just a few snips here and there, pop dots everywhere and it's done.


Altered $1 Wall Clock- Enjoy Summer
I wanted to create something different again and I truly enjoy going to $1 store and find a good bargain. This was a wall clock and i just simply took out the clock hands and used the Summer collection again to create a multi layered project. I might have to do this again, one for each season.


You Are My Sunshine Card & Happy Birthday Card
A simple card using Summer collection cut-ups with hand stitching and foam adhesive for dimensions.


Thanks Melissa for getting us ready for the Summer season!  Be sure to visit Melissa's blog.


Saturday, June 16, 2012

Tutorial with Melanie Jarocki

Melanie created this fab banner and a tutorial for our readers to recreate it!  So, let's see what is up.....


For this Father's Day banner, I mainly used the Noah collection, but also adding in one sheet from the Exit Here collection. The banner could easily be adapted for a 4th of July celebration in the USA or for a birthday.


Preparation
1. Cut six 4x6 inch rectangles from Exit Here "Hiking Trails". Trim one short edge of each rectangle into a wide upside down "V". (I went about 1 inch up from the bottom, 2 inches in from the side and made a pencil mark. Then I cut from each corner to the mark.) (The rest of the papers are all from the Noah Collection). 

2. Using a die-cut machine or template, cut 3-1/2 inch letters from "Noah's ABC's", along with shadows and heart shapes from "Honk, Honk". (I used my Slice machine, Great Outdoors card for the letters, and Remember This card for the hearts).


3. Trim two 1/2x12 inch strips from "Noah's Overalls". Cut each strip into three 1/2x4 inch strips, so you have six total strips. 

4. Using a border punch with some sort of hole in it (I used Martha Stewart star border punch), punch along the edge of "Noah's Wallpaper". Then trim a 1-1/2 inch strip from the edge of the punched border. Repeat. Cut each 12-inch strip into three strips that measure 1-1/2x4 inches.  

5. Fussy cut 20-25 stars from "Noah's Stars".
  

Assembly
6. Adhere punched border strips to tops of rectangles (opposite "v" ends), leaving 3/4-inch showing (including the punched border). Add 1/2-inch strips from "Noah's Wallpaper" on the pennant below the border, with 1/8-inch of blue background showing. Zigzag stitch between punched border and 1/2-inch strip. 

7. Assemble letters with shadows and trace around letters with red pen. Using a dimensional adhesive (I used GlueArts U-Cut-It), place smaller heart on larger heart. Adhere each of these pieces to a pennant, centering above the "V". 

8. Add a 3-1/2x5 inch photo to the remaining pennant. 9. Randomly add fussy-cut stars to each pennant.  

10. Thread twine (I used Maraschino from The Twinery) through the punched borders and hang to display. Ta-Da! 

What a fun banner!  And it can be adapted many ways, by changing the wording, adding panels, etc!  Thanks for the great project and instructions, Melanie.  Be sure to visit Melanie's blog.


01 09 10